How Do I Prepare for the Ama Dablam Expedition?
A Comprehensive Guide to Ama Dablam

How Do I Prepare for the Ama Dablam Expedition?
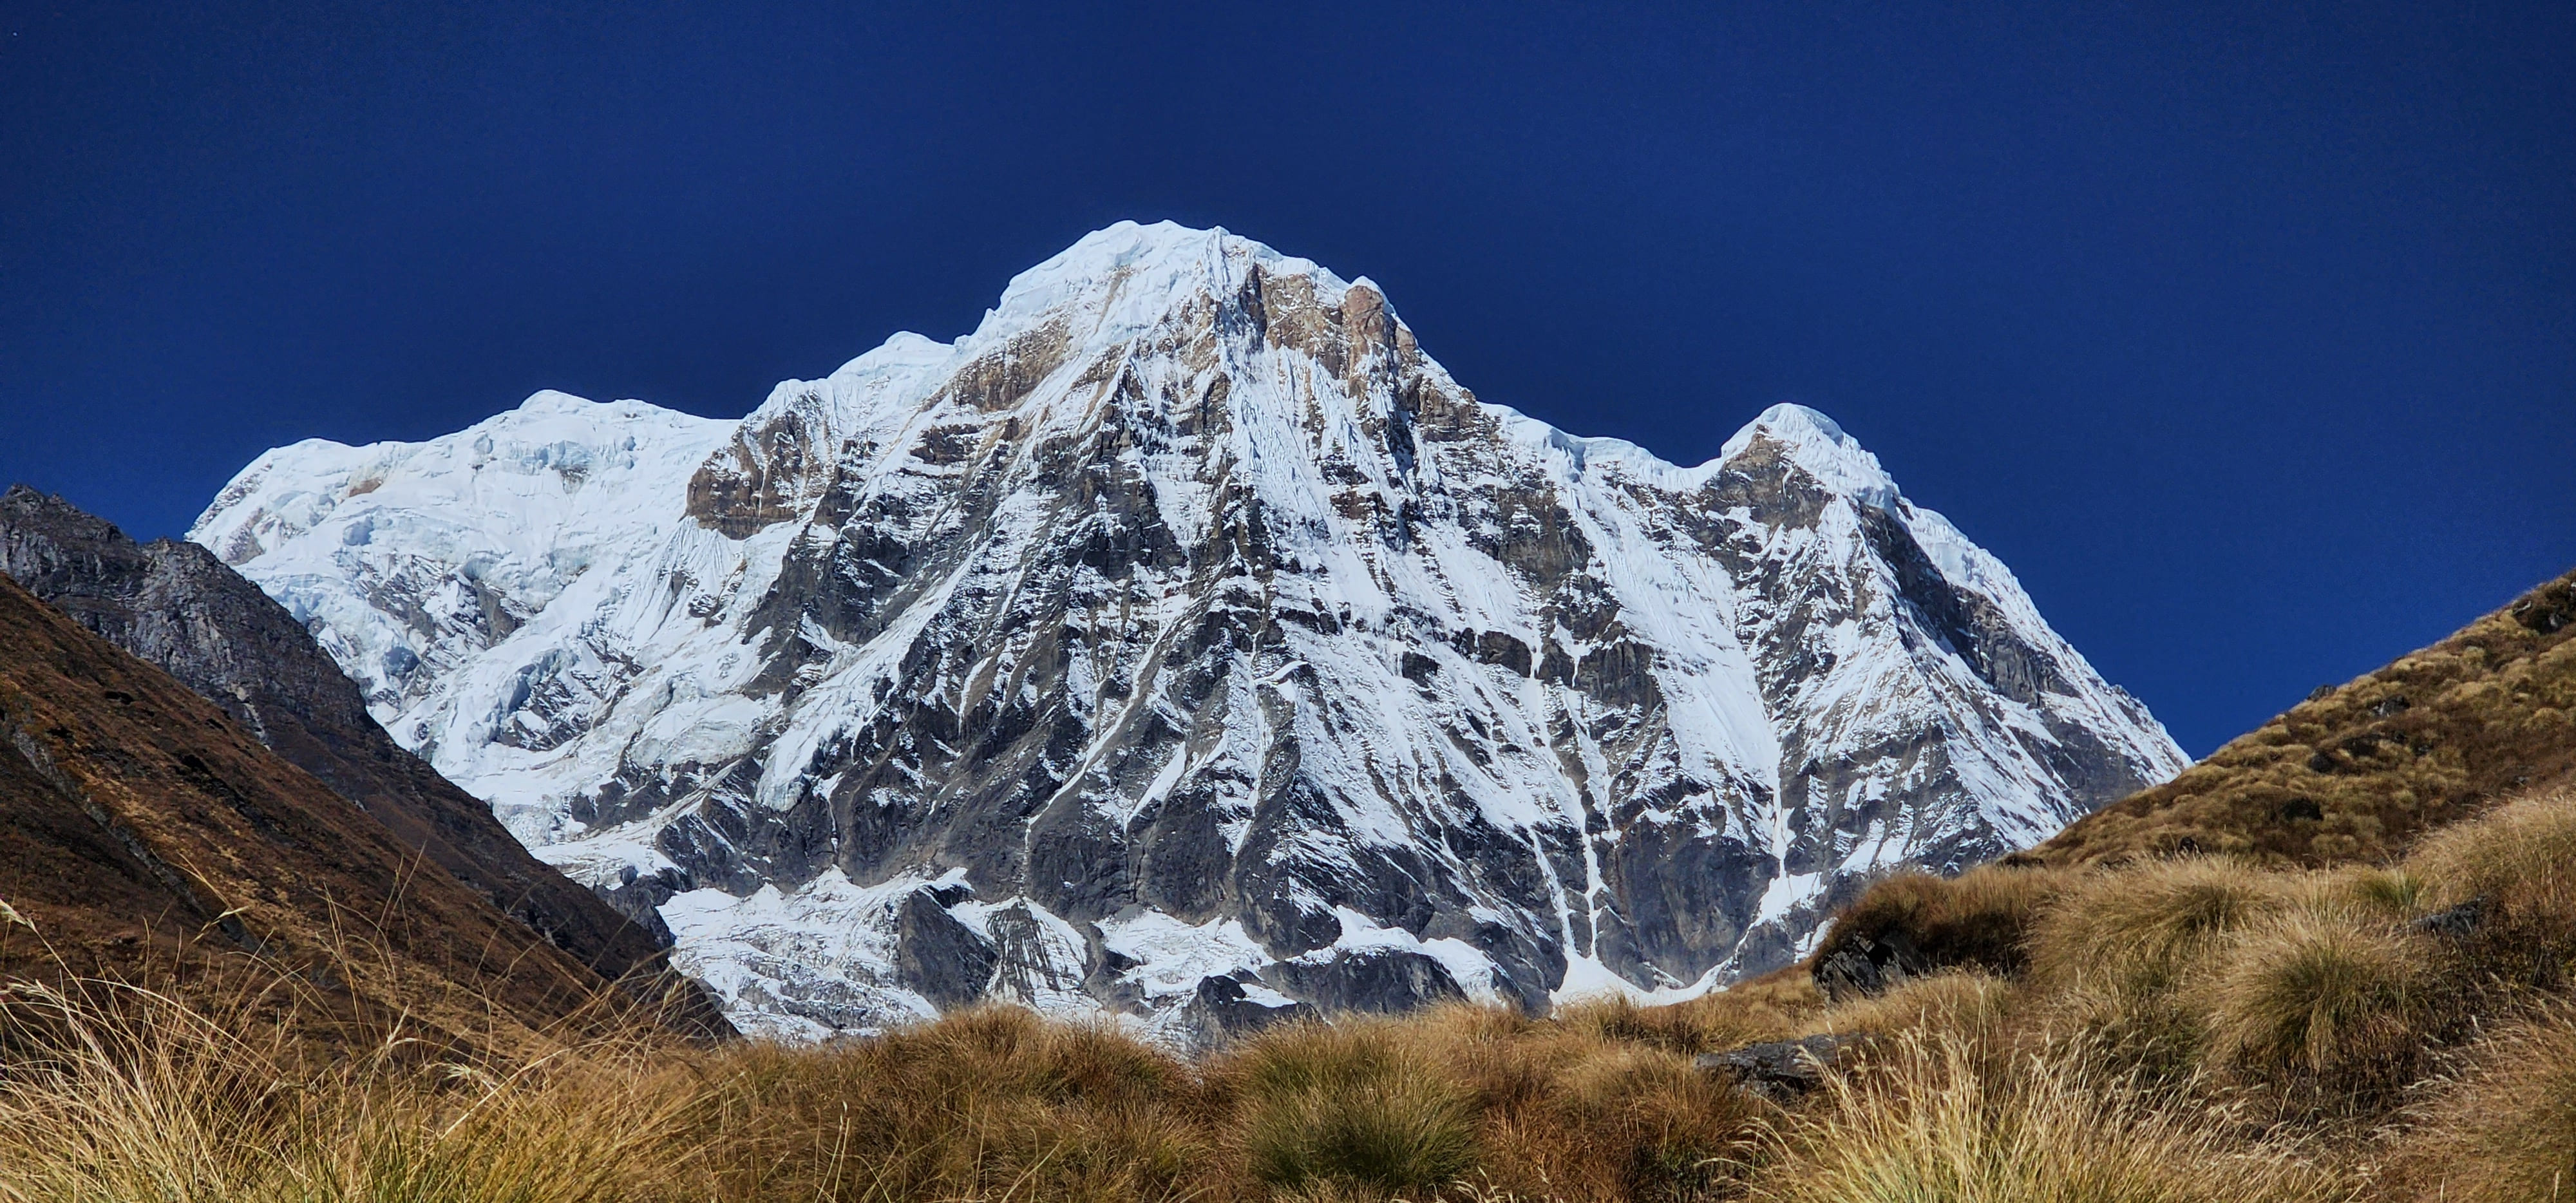
For any high-altitude climber, the sight of Ama Dablam is unforgettable. Its stunning pyramid of rock and ice rises sharply into the Himalayan sky, earning it the nickname the “Matterhorn of the Himalayas.” It’s a dream summit for climbers around the world, blending breathtaking beauty with a serious technical challenge. Climbing this 6,814-meter (22,355-foot) peak is a significant achievement, but it requires more than just ambition. A successful ascent demands thoughtful preparation, deep respect for the mountain, and a clear understanding of your skills. This guide serves as your roadmap, helping you prepare properly, stay safe, and giving you the best possible chance of standing on top of this incredible mountain.
Understanding the Ama Dablam Mountain
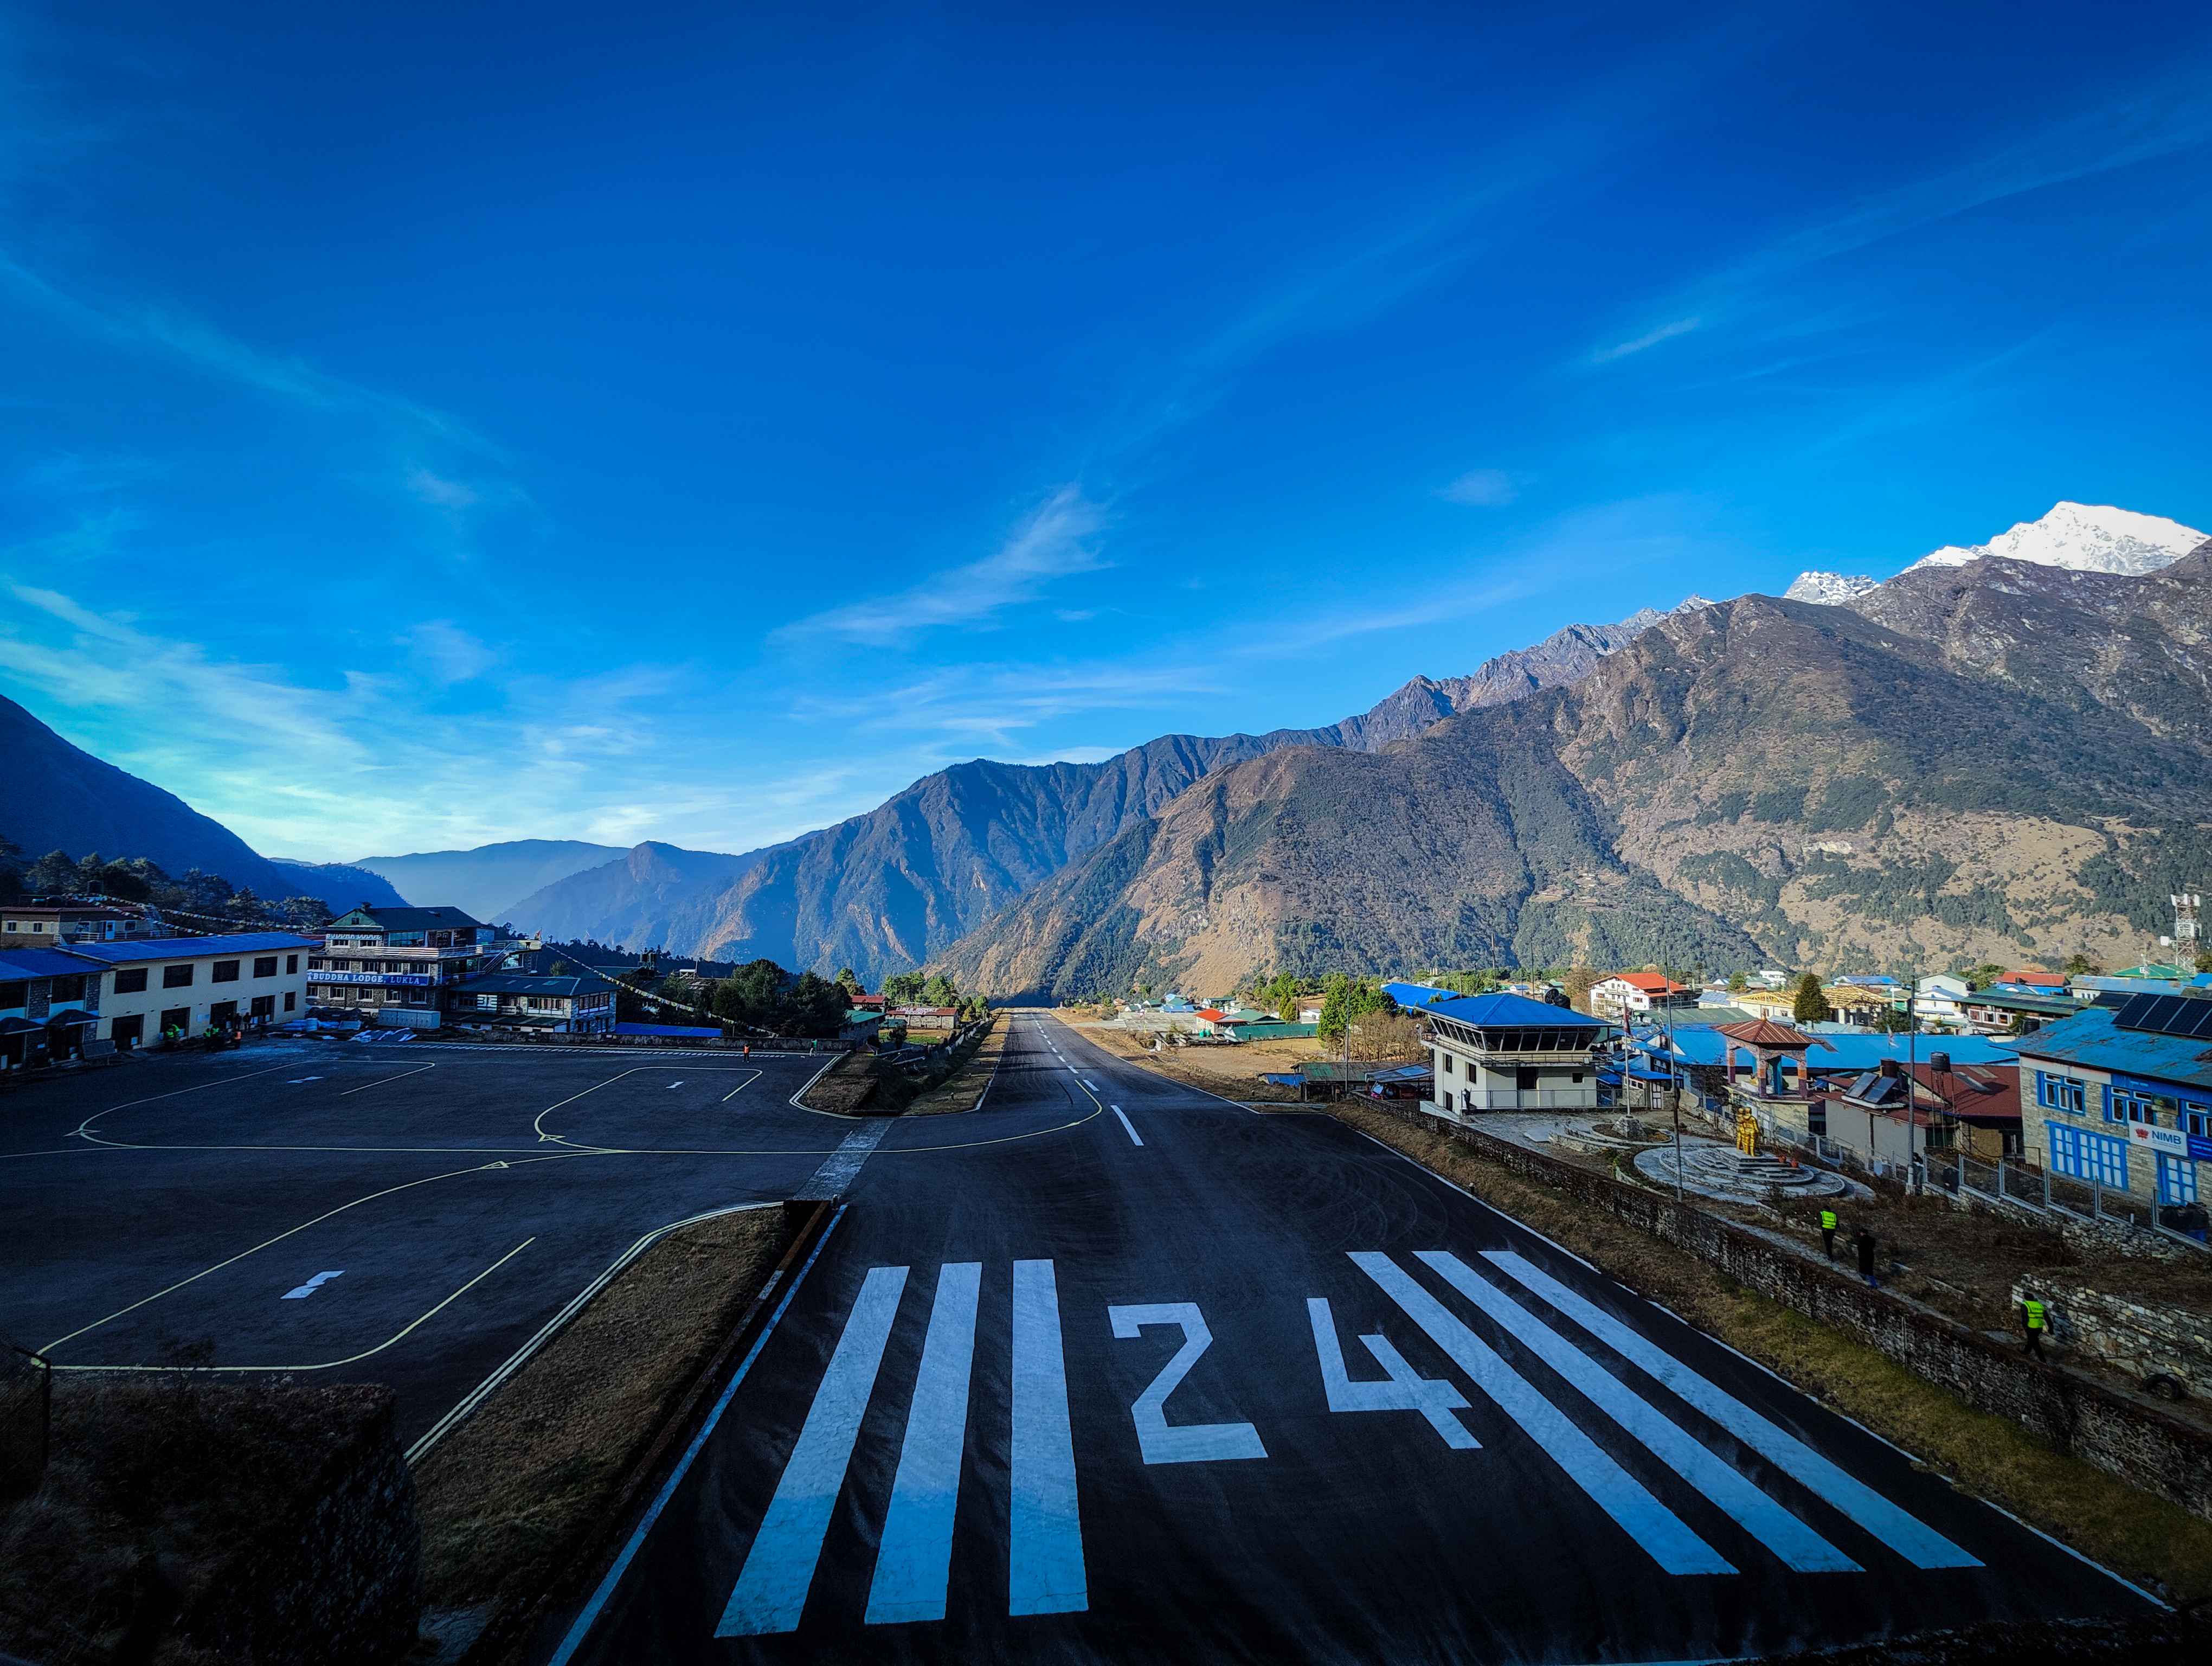
The beauty of Ama Dablam is tied to its name, which means "Mother's Necklace." The long, sweeping ridges look like the protective arms of a mother (ama), and the famous hanging glacier high on its face resembles a dablam, a sacred pendant worn by Sherpa women. This makes the mountain a profoundly spiritual and significant guardian for the local Sherpa people. Geographically, Ama Dablam is located in the heart of Nepal’s Khumbu region, inside the Sagarmatha National Park. It’s a famous neighbor to Mount Everest and Lhotse, and its stunning peak is a highlight for anyone trekking to Everest Base Camp. The journey begins with a flight to Lukla, followed by a beautiful trek through Sherpa villages like Namche Bazaar and Tengboche before you arrive at Base Camp (4,600m), your home for the climb ahead.
Brief history of the first ascent of Ama Dablam
The climbing history of Ama Dablam begins with one of the most ambitious and scientifically significant expeditions in Himalayan history. In the winter of 1960-61, Sir Edmund Hillary led the Silver Hut expedition, a unique venture designed to study the effects of high-altitude acclimatization on the human body. For months, a team of climbers and scientists lived at an altitude of 5,800 meters (19,000 feet), making them arguably the best-acclimatized group of individuals on the planet. This prolonged period at altitude set the stage for an attempt on the formidable Ama Dablam. A strong team was assembled, comprising Mike Gill (New Zealand), Barry Bishop (USA), Mike Ward (UK), and Wally Romanes (New Zealand). On March 13, 1961, they achieved the first ascent via the now-classic Southwest Ridge. Their success was a landmark moment, proving that the mountain's steep, technical terrain could be climbed.
Evaluate Your Experience Level
Even if climbers of different abilities can tackle treks in the Himalayas, it is crucial to know your skill level for Ama Dablam. This is a technical mountain, not a trekking peak. If you are new to trekking or climbing at high altitudes, it is smart to start with easier peaks like Mera Peak (6,470m), Island Peak (6,189m), or Lobuche East (6,119m). These climbs don’t need as much technical skill and will help you gain valuable experience and confidence. They will also help you learn basic mountaineering skills, like using an ice axe and crampons, and moving on fixed ropes. If you are an intermediate or expert climber with a strong background in rock and ice climbing, conquering the Ama Dablam expedition should be well within your reach. However, the climb should not be underestimated. Your climbing resume should include experience on steep, exposed terrain and multi-pitch rock climbing. Regardless of your expertise, it is vital to maintain your physical strength and ensure you are fully prepared for the challenges that Ama Dablam’s majestic heights will present.
Choosing the Right Trekking Agency
Your choice of expedition company is one of the most important decisions you will make. A good team will prioritize your safety and give you the best chance of success. Cutting costs here often means cutting corners on safety. Look for these key things in an agency:
- Aspirant / NMA Certified guides: Ensure your guides hold this top-tier certification. It guarantees they have been trained to the highest standards of safety and technical skill.
- Ama Dablam Experience: Choose a company with a strong, proven history of leading successful climbs on Ama Dablam. Their guides will know the route and its challenges inside and out.
- Strong Safety Protocols: Ask about their safety measures. They should have emergency oxygen, a satellite phone for communication, a complete medical kit, and a clear, well-practised helicopter evacuation plan.
- Good Guide-to-Client Ratios: A smaller team, with a ratio like 1 guide for every 2 clients (or even 1:1 on summit day), means you get more personal attention and support.
Choose the Best Time to Go on the Ama Dablam Expedition
Selecting the right season for your Ama Dablam expedition is a critical decision that directly impacts safety, success, and the overall experience.

The Prime Climbing Windows: Autumn & Spring
The two established and safest climbing seasons are autumn (October to November) and spring (April to May). These periods offer the most stable weather patterns, minimal precipitation, and moderate temperatures, which contribute to a significantly higher success rate for expeditions. Given their popularity, these seasons see high demand on the route and in the teahouses. Therefore, booking your expedition well in advance is essential to secure the necessary climbing permits and accommodations.
The Winter Alternative: Solitude and Severity
For the experienced mountaineer seeking solitude, a winter expedition (December to February) holds a unique appeal. The trails are quiet, and the crisp, cold air offers unparalleled clarity for photography. However, this reward comes at the cost of a significant increase in severity. Climbers must be prepared to contend with extreme cold and unforgiving high winds. A winter ascent demands meticulous gear management, a higher level of expertise, and the resilience to operate safely in a harsh and challenging environment.
The Technicalities of Climbing Ama Dablam: A Vertical Journey

To truly prepare for Ama Dablam, one must look beyond its beauty and understand its anatomy. It is a complex, three-dimensional puzzle of rock, ice, and snow that demands a specific and advanced skill set. The standard Southwest Ridge route is not a walk-up; it is a sustained, exposed, and highly technical climb that unfolds in distinct and challenging stages. Here is a detailed breakdown of the mountain's features and the vertical journey from Base Camp to the summit.
The Mountain's Structure: Geologically, Ama Dablam is composed primarily of granite gneiss, a complex, metamorphic rock. This gives the mountain its solid, sculptural feel and provides excellent rock for climbing, particularly on the lower sections of the ridge. The upper mountain, however, is a different beast. It is draped in snow and ice, culminating in the iconic and ominous hanging glacier, the Dablam. The interplay between solid rock and frozen features defines the technical character of the climb.
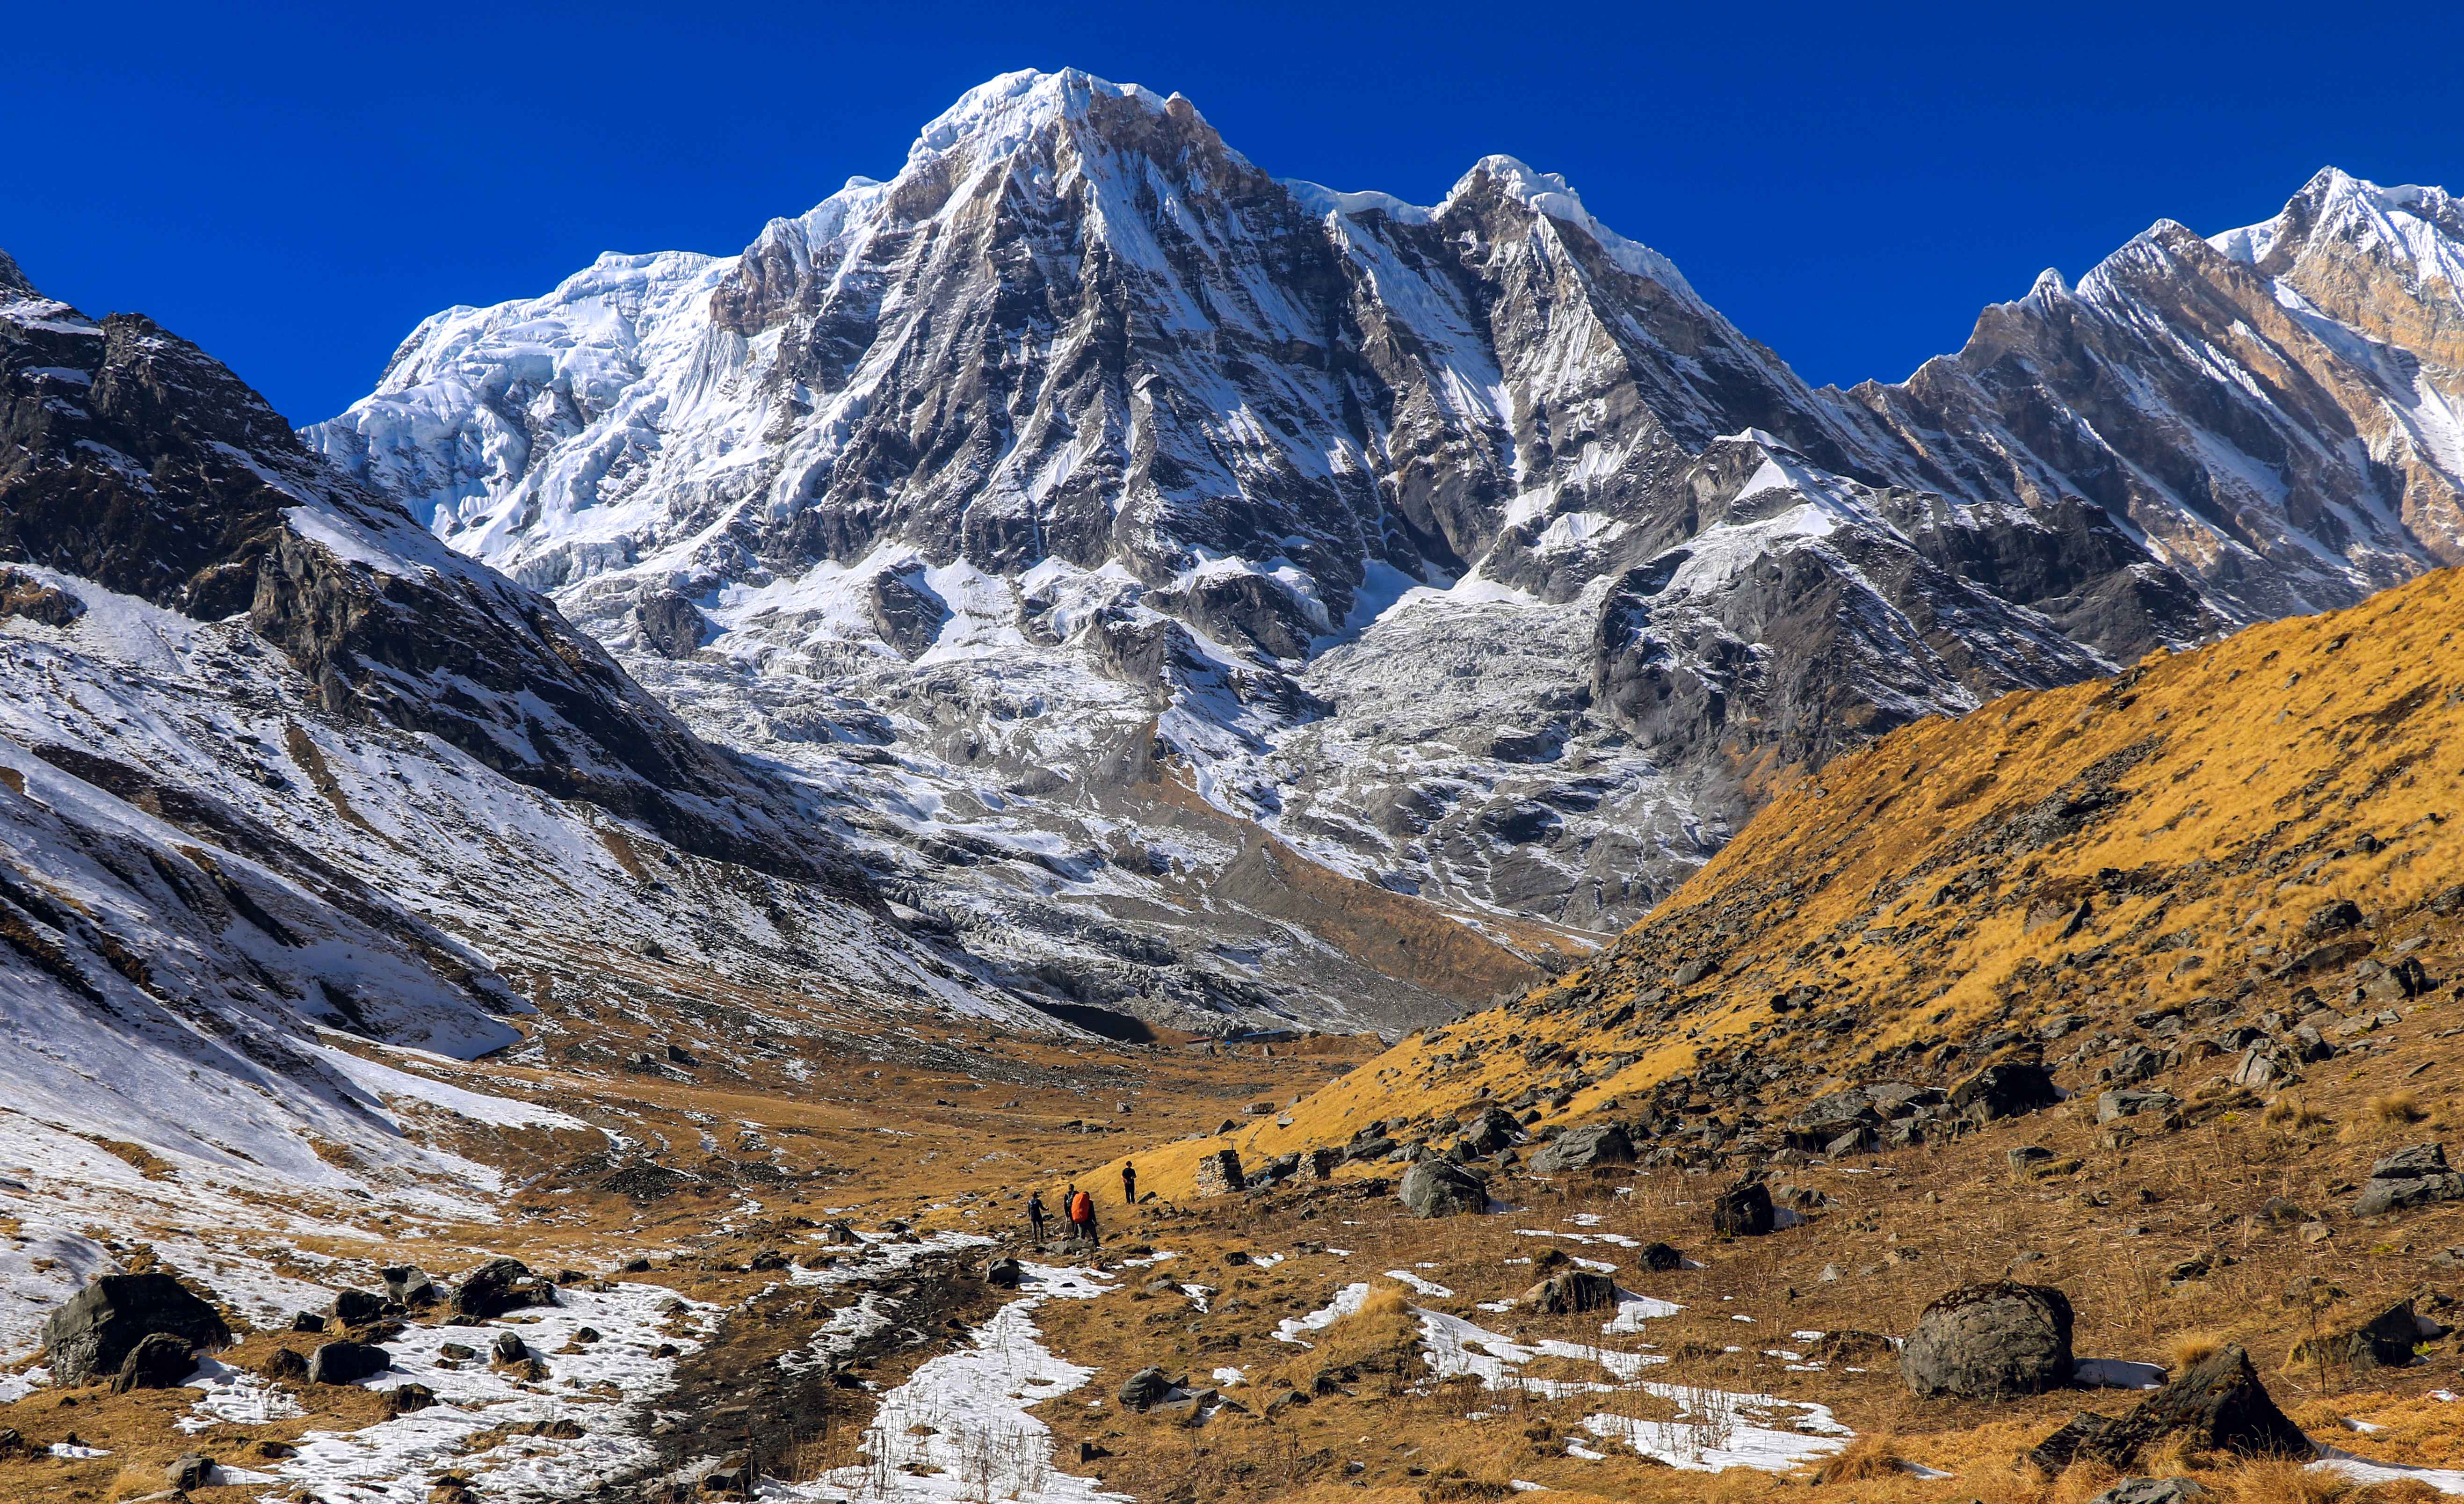
The Trek to Base Camp (4,600m / 15,091 ft): While not technical, the journey to Base Camp is a crucial part of the expedition. The 7 to 9-day trek through the Khumbu Valley allows for critical initial acclimatization. Base Camp itself is situated in a beautiful, grassy meadow with a direct and inspiring view of the entire Southwest Ridge. It is a relatively comfortable and secure staging ground where teams rest, plan, and prepare for the vertical world above.
Base Camp to Camp 1 (5,700m / 18,700 ft): The first leg of the climb is a significant physical test. The route leaves the meadows of Base Camp and ascends through boulder fields and grassy slopes. As you gain elevation, the terrain becomes a mix of scree and large granite moraine boulders, requiring careful footwork and what is often described as "endless scrambling." This section is physically demanding but does not typically require ropes. The journey takes approximately 4-6 hours and involves a substantial vertical gain of over 1,000 meters. Camp 1 is perched on a small, rocky outcrop on the ridge proper. It is an exposed but relatively flat area, offering breathtaking views of the valley below and the peaks of Kantega and Thamserku. This is the last point on the mountain that feels grounded before the technical climbing truly begins.
Camp 1 to Camp 2 (6,100m / 20,013 ft) The Technical Crux: This is where Ama Dablam reveals its true character. The section from Camp 1 to Camp 2 contains the most famous and technically demanding rock climbing of the entire route. The ridge narrows significantly, and climbers must navigate steep, exposed granite slabs and towers. The whole section is equipped with fixed ropes, and mastery of ascending with a jumar is non-negotiable. The undisputed crux of this section is the Yellow Tower. This is a near-vertical, 25-30-meter (80-100 ft) pitch of solid granite. While not exceedingly difficult for a seasoned rock climber (graded around US 5.9 / French 4c), undertaking it at an altitude of nearly 6,000 meters while wearing cumbersome mountaineering boots and a pack is a serious challenge. Your movements must be efficient and precise, relying on both large handholds and delicate footwork. Beyond the Yellow Tower, the ridge continues with sustained, exposed climbing on what is known as the Grey Couloir. This involves navigating a series of rock steps and gullies, all while attached to the fixed lines. The exposure is immense, with thousands of feet of air dropping away on either side.
Camp 2 is located in a spectacular but precarious position. It is carved out of the rock and snow on the ridge, with minimal space. Platforms for tents are often dug into the side of the mountain, and moving around camp requires being clipped into safety lines at all times. The exposure is relentless, but the position is magnificent, feeling like an eagle's nest amidst the Himalayan giants.
Camp 2 to the Summit (6,814m / 22,355 ft): The nature of the climb changes dramatically above Camp 2. The rock gives way to steep snow and ice. The route traverses eastward off the ridge and onto the upper snowfields. Here, climbers encounter the Mushroom Ridge, a narrow and heavily corniced snow ridge that requires extreme caution and perfect crampon technique. The exposure here is arguably even greater than on the rock below.
The most significant objective hazard on the mountain looms directly above this section: the Dablam. This massive hanging glacier, or serac, is an active and unpredictable feature. A significant serac collapse from the Dablam in 2006 was a tragic reminder of this danger. To mitigate this risk, modern expeditions move very quickly through this area. Many teams now bypass the traditional site of Camp 3 altogether, opting for a single, long summit push directly from Camp 2. This strategy minimizes the time spent in the direct fall line of the serac.
The final ascent involves climbing steep snow and ice slopes, often angled between 50 and 60 degrees. The route leads up onto the final summit pyramid, culminating in a sharp, snowy ridge that leads directly to the small, pristine summit.
The Summit and the Descent: The summit of Ama Dablam is a breathtaking reward for the immense effort. It is a small, airy platform offering a 360-degree panorama of the world's highest peaks, including a unique and intimate view of Mount Everest, Lhotse, and Makalu.
The descent is just as dangerous, if not more so, than the ascent. It requires multiple long rappels (abseils) down the entire technical section from Camp 2 back to Camp 1. This process is exhausting and requires absolute focus, as fatigue makes mistakes more likely. From Camp 1, climbers scramble back down the moraine to the safety and relative comfort of Base Camp.

Maintain Physical Fitness
Climbing Ama Dablam is physically demanding, so you need to arrive in peak condition. Start a dedicated training plan at least 3-6 months before your expedition. Your training should focus on:
- Cardio Endurance: Activities like running, cycling, and swimming build your engine for long days on the mountain. The best training is hiking long distances with a weighted pack (15-20 kg) to simulate climbing.
- Strength Training: Focus on your legs, core, and upper body. Squats, lunges, pull-ups, and core exercises will build the strength you need for steep terrain.
- Mental Stamina: High-altitude climbing is as much a mental game as a physical one. Practice staying positive and pushing through discomfort. Mental toughness is what will get you through the toughest parts of the climb.
Secure the Permit and Documents
Your expedition agency will handle the necessary permits, but you should know what’s required. These include:
- An Ama Dablam Climbing Permit.
- A Sagarmatha National Park Entry Permit.
- A TIMS (Trekkers' Information Management System) Card.
Most importantly, you must have specialized travel insurance. Your policy needs to cover high-altitude mountaineering and include helicopter evacuation coverage up to at least 7,000 meters. This is a requirement for your permit and is essential for your safety.
Understand Safety Precautions and Challenges
Safety is the number one priority. While the standard route is well-established, there are always risks you need to manage.
- Altitude Sickness: The most significant threat. A slow and steady acclimatization schedule is the best way to prevent it. Always be honest with your guide if you feel any symptoms.
- Technical Sections: The route has very steep and exposed sections, including the famous "Yellow Tower," a vertical rock pitch, and the exposed "Mushroom Ridge." You must be comfortable and efficient on fixed ropes.
- Weather and Icefall: The weather can change in an instant. The hanging glacier (the Dablam) is also an objective hazard. Your guides will manage these risks, and you must trust their decisions to turn back or wait for a better window.
Choose the Right Gear and Equipment
Having the right gear will keep you safe, warm, and comfortable. You can rent some things in Kathmandu, but personal items like your boots, harness, and helmet should be your own.
Upper Body:
• Base Layers (2-3): Lightweight, moisture-wicking shirts (both short and long-sleeved) form the foundation of your system. • Mid-Layer (1-2): A fleece wind-stopper jacket or pullover provides insulation while remaining breathable.
• Shell Jacket (1): A high-quality waterproof and windproof shell jacket (Gore-Tex or similar) is your primary defense against foul weather.
• Expedition Down Jacket (1): This is arguably your most important piece of gear. A high-quality, 800-fill expedition-weight down jacket is essential for the extreme cold of the higher camps and the summit push.
Head and Face Protection
• Sun Hat: Crucial for sun protection during the trek and at Base Camp.
• Beanie/Lightweight Hat: A warm fleece or wool hat for cold conditions.
• Headlamp: An essential piece of kit for pre-dawn starts. Bring a robust, reliable model with extra batteries.
• Glacier Sunglasses: High-quality, category 4 sunglasses are mandatory to prevent snow blindness.
• Ski Goggles: For protecting your eyes from high winds and blowing snow on the upper mountain.
• Bandana or Buff: A versatile item for sun protection, warmth, and dust protection.
Handwear: A Critical Multi-Glove System
Frostbite is a serious risk. A three-layer glove system is the best way to protect your hands.
• Liner Gloves: Lightweight synthetic gloves for dexterity when handling gear.
• Windstopper Fleece Gloves: Your workhorse gloves for mid-temperature climbing.
• Expedition Mittens: Heavy-duty, expedition-rated mittens are your ultimate protection for the summit push.
Lower Body:
• Trekking Pants/Shorts: For the comfortable trek into Base Camp.
• Lightweight Trousers (2 pairs): Breathable pants for climbing in milder conditions.
• Fleece or Woollen Trousers (1 pair): An essential insulation layer worn under your shell pants on cold days.
• Waterproof Shell Pants (1 pair): Wear these over your other layers to protect from wind, snow, and rain.
Footwear: Your Connection to the Mountain
• Double-Layer Mountaineering Boots: These are required for the climb.
• Socks (Multiple Pairs): Bring a mix of lightweight inner socks, medium-weight hiking socks, and thick wool socks for sleeping. Keeping feet dry is critical.
• Gaiters: To keep snow out of your boots on the lower mountain.
Personal Kit for Camp and Trek
• Expedition Duffel Bag (1): A large (90-120 liter), durable bag for porters or yaks to carry.
• Backpack (1): A 50-70-liter pack is what you will carry on the mountain with your gear.
• Sleeping Bag: A high-quality bag rated to at least 0°F (-18°C) is essential. A -20°F (-29°C) bag is even better.
Inflatable Sleeping Pad: A full-length, insulated pad is crucial for a warm night's sleep.
• Water Bottles (2): Two one-liter, wide-mouth Nalgene-style bottles are recommended as they are less likely to freeze than hydration bladders.
• Pee Bottle & Pee Funnel (for women): Allows you to relieve yourself inside your tent without having to face the freezing night, which is crucial for staying warm and hydrated.
• Trekking Poles: Highly recommended for saving your knees on the long trek.
• Toiletry Bag: Keep it simple with essentials like a toothbrush, toothpaste, soap, deodorant, and hand sanitizer.
Small Padlocks: For securing your duffel bag during transit.
• Basic Essentials: Include a Swiss Army knife, cigarette lighter, disposable rubbish sacks, and a trim synthetic towel.
Personal Medical Kit
Your expedition will have a comprehensive medical kit, but you must carry your kit with items you are familiar with.
• Personal Prescriptions: Any medication you take regularly, plus extras.
• Diamox (Acetazolamide): Consult your doctor about using this for altitude sickness prevention.
• Pain Relief: Ibuprofen or Paracetamol for headaches and muscle soreness.
• Blister Repair Kit: Moleskine or Compeed is essential. • Antibiotics: For chest or stomach infections (prescribed by your doctor).
• Basic First-Aid: Band-aids, antiseptic wipes, and sun protection cream.
• Water Purification Tablets: For treating water on the trek.
Travel Luxuries & Optional Items
These items can make the long days at Base Camp more enjoyable.
• Books, Journal, Pen: For downtime.
• Camera: To capture the incredible memories.
• Solar Charger/Power Bank: To keep your electronics charged.
• Travel Games: A deck of cards or chess can be great for team bonding.
The ascent of Ama Dablam is a serious undertaking where the margin for error is small. The most critical decision a climber makes is their choice of expedition operator, as this directly impacts safety and the potential for success. At Freedom Adventures, our operational philosophy is founded on uncompromising safety standards and expert leadership. IFMGA-certified guides lead our expeditions with extensive experience on Ama Dablam's technical terrain. We manage all logistical complexities, from permits to provisions, allowing you to focus entirely on your acclimatization and the physical demands of the climb. Ultimately, a successful Ama Dablam expedition is a journey built on respect, preparation, and expert guidance. For a professionally managed expedition grounded in safety and experience, we invite you to contact Freedom Adventures.
KEEP EXPLORING
Uncover similar insights
Everything You Need to Know to Prepare for Your ABC Trek
Ensuring equal inclusion for persons with disabilities in the sports and tourism